An R reproducibility toolkit for the practical researcher > Day 4 > 01: Reproducible computational environment with Docker
01: Reproducible computational environment with Docker
By Paola Corrales and Elio Campitelli
While renv is nice, it doesn’t solve the whole problem, because system dependencies and even the R version itself can change. Another issue is that downloading and installing all the R packages can take a while. Like an hour or more. This is not a deal-breaker, but it' be great to do better. People trying to reproduce work are few and far between, so it’s important to make their lives as easy as possible.
One way to address this issue is to use some sort of containerisation solution. Instead of making people run your code inside their machine and creating some elaborate system to make sure their machine has all the correct packages and system components, just offer a machine with all the relevant software pre-installed. Of course, buying and shipping physical laptops to every one that needs to reproduce a result is not feasible; a virtual machine is the next best thing.
One class of containers are virtual machines that run in some server. These services will manage most of the technical complexity of setting up and spinning up the containers and offer a web-based platform to interact with it. Posit Cloud, Binder, Code Ocean, Saturn Cloud and Code Ocean are some examples. They are generally easy to set up and use at the expense of heavily depending on external services and... well, expenses. One important aspect for reproducibility is that since they provide an standardised hardware setup, they can empower users without powerful machines to reproduce demanding analyses.
Another class of containers are locally-run containers. These run locally on the user’s machine and thus don’t depend so much on external servers' uptime. On the other hand, they require some local setup and the resulting performance can depend on the user’s computer. In this workshop we will create a container using Docker. This is not the only software but it’s the more popular and it’s well supported by the R community.
Docker
The Docker workflow will be to create a Docker image with a specified R version and installed packages and run your code inside that virtual machine. Then, share this image on Docker Hub, so that anyone can download it and spin it up on their computer within minutes.
So you could create a docker image, do all the system dependencies and R package dependencies setup that can take an hour or more, and then publish that. If someone wants to reproduce your work, they can just get the image, run it, and they are ready. And not only that, but you could also add all the necessary data that can also take hours to download.
In that sense, docker is not only a boon for reproducibility but also for usability.
At the heart of the docker image is the Dockerfile, a plain-text file with a series of commands that are then executed inside the image.
The Dockerfile is the recipe to create the container, install packages, update dependencies, etc… This recipe is fed into docker which will then run those steps and build the container image properly.
You will then be able to share this container on DockerHub for anyone to be able to download it. For this you will need to create a DockerHub account. (Remember your username, because you will need it).
Once build, the container can be booted up and you or anyone else can run the analysis in this isolated and stable container.
Your first docker
All this might sound intimidating at first, but thanks to the awesome R community, spinning up your own docker instance with R and RStudio ready to use is relatively painless. The rocker team maintains a suite of docker images that came with R and RStudio pre-installed. Assuming that you’ve got docker up and running, you can spin up a virtual machine running R with this command in the terminal ( what’s a terminal do you ask?):
docker run -p 8787:8787 \
  -e DISABLE_AUTH=true \
  rocker/rstudio:4.1.2
If you didn’t download a docker image before, the first time you run this command you’ll see something like
    Unable to find image 'rocker/rstudio:4.1.2' locally
   4.1.2: Pulling from rocker/rstudio
Which will inform you of the process of downloading the remote image to your local machine.
When it’s done, open a browser and navigate to
localhost:8787
Run RStudio inside docker
- Run
docker run -p 8787:8787 -e DISABLE_AUTH=true rocker/rstudio:4.1.2inside a terminal. - Once it finishes, go to localhost:8787 on your browser of choice.
Some notes on this command:
-
runis the command to run an image. -
-p 8787:8787tells docker to map the 8787 port inside the container to the local 8787 port. This is the port that RStudio uses to connect via a browser. -
-e DISABLE_AUTH=trueis an extra argument specific to this image that disables authentication. As long as you use this image locally, it’s safe to do this. Otherwise, don’t. -
rocker/rstudio:4.1.2is the name of the image that needs to be run.
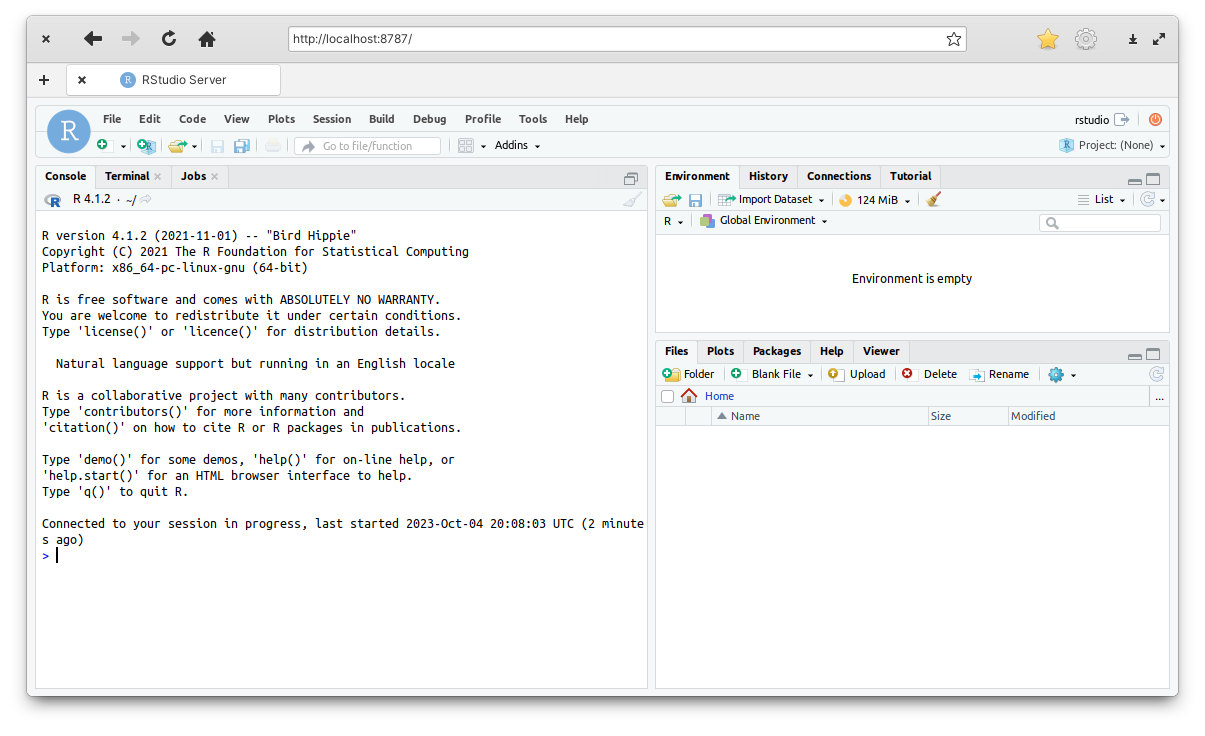
Figure 1: RStudio running inside docker.
Surprise!
You’ve got RStudio running inside a Docker container.
Notice that the R version is 4.1.2 which is most likely not the version you have installed locally.
By using the rocker/rstudio:4.1.2 you fixed the R version to 4.1.2.
Now you could use this docker instance to run R code, create files, analysis, etc… But there’s a small issue: docker instances are ephemeral. Anything you do inside the container will be lost once the container is closed. Each time you spin up the container it starts as a blank slate. You need a way of making sure that files are created in the local machine and are don’t disappear with the container.
To do this you need to use an option that maps a local folder in your machine to a folder inside the container.
So let’s create a docker-projects folder in the local machine and map that folder to /home/rstudio/projects inside the docker container.
mkdir ~/docker-projects
docker run -p 8787:8787 \
    -e DISABLE_AUTH=true \
    -e USERID=$UID \
    -e GROUPID=1001 \
    -v ~/docker-projects:/home/rstudio/projects \
    rocker/rstudio:4.1.2
Some notes on this new lines:
-
mkdir ~/docker-projectscreates a new folder in your machine called “docker-projects”. The~represents the home directory, which is the My Documents folder in Windows and/home/<username>on Linux. -
-v ~/docker-projects:/home/rstudio/projectsis the command to map a local folder (~/docker-projects) to a folder inside the container (/home/rstudio/projects).
Now you can create files, projects, results, inside the container in /home/rstudio/projects (in this case from the Files tab in Rstudio) and any change will live on in your local machine in ~/docker-projects.
Run a new container
- Stop the previous container with
Ctrl+CorCommand+C. - Run in the terminal
mkdir ~/docker-projects
docker run -p 8787:8787 \
    -e DISABLE_AUTH=true \
    -e USERID=$UID \
    -e GROUPID=1001 \
    -v ~/docker-projects:/home/rstudio/projects \
    rocker/rstudio:4.1.2
- Once it finishes, go to localhost:8787 on your browser of choice.
- Create a new file or folder suing the Files tab in RStudio and check if the new file/folder is also present in the docker-projects folder.
The ephemeral nature of the docker container is still not resolved, however. The container will not “remember” any R package you install while it’s running. Likewise, it will not preserve system dependencies. Furthermore, using the same Docker image for every project would defeat the purpose of having a stable environment for each project.
To solve these issues you need to create and customise a Docker image for each project.
Killing docker containers
At some point it’s possible that you spin a container in “detached mode” with the option -d.
This means that the container will run in the background, which can be useful if you want to have the terminal available but can be annoying because then there’s no obvious way of stopping the container.
You might even forget that the container is running.
To see a list of currently running containers use
docker ps
You can kill a specific container by using its CONTAINER ID with
docker kill {CONTAINER ID}
(replacing {CONTAINER ID} with the CONTAINER ID)
Or use this command to stop all running containers.
docker kill $(docker ps -q)
Your second docker
Until now you’ve use rocker/rstudio docker image.
But if you need to install system dependencies and R Packages you will need to modify this image to install them.
This is done with the Dockerfile, a set of steps required to build an image.
Download this
old reproducible project.
Since each project should have its own Dockerfile, let’s create a file called Dockerfile at the root of the project and put these lines in:
FROM rocker/rstudio:4.1.2

WORKDIR /home/rstudio/project

COPY renv.lock renv.lock
COPY renv/activate.R renv/activate.R

RUN chown -R rstudio . \
 && sudo -u rstudio R -e 'source("renv/activate.R"); renv::restore()'
The first line tells docker to base this new image on the rocker/rstudio:4.2.1 image.
Then, with that as a base, it will then run the next steps.
Next it set the working directory of the container to /home/rstudio/project.
The next steps might look weird because it seems to copy the renv.lock onto itself.
The key here is that the COPY instruction takes a route in the local machine and copies it into the container.
COPY renv.lock renv.lock takes the local renv.lock file and copies it into a renv.lock file inside the container.
The two files being copied are the lockfile and the renv bootstrap script that will install the correct version of renv.
The final line starts with RUN, which is docker-speak to run commands in the terminal.
The important part here is that it runs R -e 'source("renv/activate.R"); renv::restore(), which bootstraps renv and restores the project library.
This image doesn’t install any system dependency, but if you wanted you could install them using apt-get.
For instance, if your image needed the netcdf library (a meteorology related library), you would add
RUN apt-get update && apt-get install netcdf-bin -y
right after the FROM line.
So, with this Dockerfile you can now actually build a Docker image with docker build.
For tidyness sake, let’s also name this container with the -t (tag) option:
docker build . -t [username]/reproducible_project
Where [username] is your DockerHub username.
By running the previous command in the terminal, Docker will now go step by step, setting up the image. You will see that R will install all the necessary packages using the information in the lockfile.
When it ends it will output something like this.
=> => naming to docker.io/[username]/reproducible_project 0.0s
This means that you have a working Docker image in your computer. Now what’s left to do is to run it with this command from the terminal:
docker run --rm  -p 8787:8787 \
    -e DISABLE_AUTH=true \
    -e USERID=$UID \
    -e GROUPID=1001 \
    -v $(pwd):/home/rstudio/project \
    -v /home/rstudio/project/renv \
    [username]/reproducible_project
You’ll notice that this is very similar to the command used to launch the rocker/rstudio container.
The new bit here is that the line -v /home/rstudio/project/renv makes sure that the container does not mount the local renv folder.
Now you can go to
localhost:8787, open the reproducible_project and render report.qmd.
Sharing docker
So now you have a computational environment that holds both R packages and system dependencies constant.
But it’s only accessible to you on your machine.
You need to make it public so that anyone can pull it, exactly how you pulled rocker/rstudio.
You need con configure your terminal to use your DockerHub account with
docker login
The terminal will show:
USING WEB-BASED LOGIN
To sign in with credentials on the command line, use 'docker login -u <username>'

Your one-time device confirmation code is: HGCB-MBFK
Press ENTER to open your browser or submit your device code here: https://login.docker.com/activate

Waiting for authentication in the browser…
Press enter and follow the instructions in your browser to log in or create an account. Once you’re logged in, you will see something like this:
WARNING! Your password will be stored unencrypted in /home/elio/.docker/config.json.
Configure a credential helper to remove this warning. See
https://docs.docker.com/engine/reference/commandline/login/#credential-stores

Login Succeeded
Then, you push your container with
docker push [username]/reproducible_project
Once the image is uploaded, you can go to your DockerHub repositories.
Now what anyone needs to do to download and run your same exact computational environment is to run this code
docker run --rm  -p 8787:8787 \
    -e DISABLE_AUTH=true \
    -e USERID=$UID \
    -e GROUPID=1001 \
    -v $(pwd):/home/rstudio/project \
    -v /home/rstudio/project/renv \
    [username]/reproducible_project
Clean up your Docker cache
Docker images can be rather heavy and they tend to accumulate. To free up some disk space you can run
docker system prune -a
to delete unused containers.
Resources
Setting up a transparent reproducible R environment with Docker + renv